


9.21.21
PROJECT 1 - JOURNEYSCAPES
Project 1: JourneyScapes (Due 9.21.21)
For this major project, you will be tasked with 3D modeling several different 3D scenes pertaining to a fictional film, television show, video game, book, etc. Specifically, you will choose one of your favorite fictional stories and then create 3 different 3D scenes from that story. 1 3D scene from the beginning, 1 3D scene from the middle, and 1 3D scene from the ending. Things to consider & accomplish:
-
Scenes should generally be created in a low poly design aesthetic
-
Scenes should primarily be comprised of solid color materials (but image-based textures can be used if they fit the style)
-
Characters may be added but this should primarily be an exercise in environmental modeling
-
Models should be appropriately detailed
-
3D scenes should include non-default lighting
-
Each 3D scene should include several animated elements
-
Each of your 3 3D scenes should include a 3-camera fly-though
-
Each scene fly-though should be roughly 15 seconds long or 5 seconds per camera (45 seconds in total length)
-
Camera fly-throughs should be rendered as videos and uploaded online
-
You may use other video editing software to compile 1 continuous video
-
Any audio should be copyright-free
Assignment: Concepts (Due 9.14.21)
As you begin to think about Major Project 1: JourneyScapes, compile a series of concepts that will serve as the foundation of your project. Your concepts should include:
-
Screenshots or still images from your source material
-
Inspirations of other 3D models or styles found online
-
Hand-drawn sketches (by you) of the scenes that you intend on constructing
-
A brief write-up (creative brief) of what you intend on doing for this project
Creative Brief
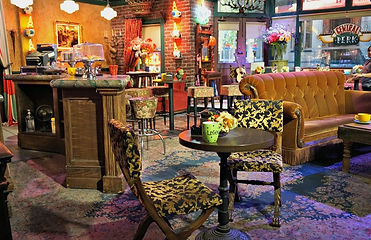
When thinking about media that I would love to recreate, the first thing that came to mind was Friends. I watched this show multiple times throughout high school, so I'm most familiar with the main sets where most of the shooting was done. The three scenes I've chosen are Central Perk Cafe, Monica's apartment, and Joey and Chandler's Apartment. After looking at different 3D Lego models, I used them as inspiration and will recreate the Thanksgiving episode where Joey gets the turkey stuck on his head. This episode is shot in each scene, so it's the perfect one to have the beginning, middle, and end needed for the story.
Screenshots
When it came to my screenshots, I wanted to find as many angles of each set as possible.
Scene 1: Central Perk


Scene 2: Monica's Apartment


Scene 3: Joey and Chandler's Apartment (not as many still images)


3D Models
When it came to 3D models, the best ones I could find were actually Legos! These models are perfect because they'll help me simplify all of the shapes and get the main aspects of each room in my design.


Hand-Drawn Designs
For my hand-drawn designs, I'm used to drawing digitally, so I used procreate to map out each scene and the different furniture pieces and elements I thought were most important to include. Scenes are ordered 1 - 3 from top to bottom!


Final Design and Process
When it came to modeling these scenes, I always started with the floors then subdivided my vertices to create the correct floor plan. I added planes for my walls and extruded all of them so they had some depth and weren't just flat. After that, I created windows by adding a boolean modifier to the wall and turning the transparency down with alpha blend. For Central Perk, I added an image to the window that has the name of the coffee shop since this was an important aspect of this scene. I then created the doors and finally constructed the larger pieces of furniture like countertops or basic tables that I didn't need a tutorial for.
I followed a LOT of Blender tutorials for the more complicated pieces of furniture in my scenes (chairs, couches, tables, and smaller decor items) and duplicated them if they were used multiple times throughout my scene (coffee mugs, stools, tables, and doors for the most part). Image textures were very handy as each of these scenes relied heavily on these elements and I wanted it to be as true to my reference photos as possible. However, in my reference photos, I noticed that the pictures weren't the exact same when it came to colors and textures. I found this a bit odd but used my best discretion and what I was used to seeing when watching the show.
For my animated elements, I wanted to keep things realistic, but also fun! In Central Perk, I made the neon signs flicker, made coffee and sugar pour into mugs, made the clock's second hand tick in real timeand also had the cake stand open to reveal the donuts underneath. In Monica's apartment, I made the sun set, added a ticking clock (second hand clicking in real time again), had the table lights change colors, and made the TV flicker. Finally, in Joey and Chandler's apartment, I wanted to play with the games, so I had the soccer ball on the foosball table roll to make a goal, made one of the darts hit the dartboard, had the light on the table turn on, and also made their TV flicker.
After looking at my hand-drawings, I ended up cutting a lot of little details out because there were so many I had included, and it wasn't realistic to have everything, so I stuck with those big picture elements that were the most important.
I finally added my 3 cameras to each scene and used the Friends instrumental;soundtrack and funny clips as my background sound and made sure this was copyright-free. You can see my final video below!
Revisions
Since we were allowed to do revisions, I fixed up scene 3 (joey's apartment) by adding a new color to the scene world (deep yellow/orange) and also made the camera end by going into the TV which was suggested in class! I also added a small intro title scene to my project so that it felt fully finished and didn't just jump right into the first scene. Finally, I slowed the song down a tiny bit so that I could fit all three of my scenes into the full song. See the completed video below!